 Supplies
Tube of Choice
I am using the amazing artwork of Ismael Rac which you must have a license to use. Please do not use his work without purchasing a license from AMI
here.
Scrap Kit of Choice
I have used a gorgeous Pay to Use Kit, called On The Wings of Love by Susan from Shal's World, you can pick this kit up at Mistaken Art
here.
Mask of Choice
I have used Weescotslass Mask 223. You can pick it up at her blog
here.
Font of Choice
I am using a font called 1 Journeyman DNA, which you can pick up from DaFont
here.
Additional Supplies.
You need Eye Candy 4 or its equivalent, which you can pick up at the Alien Skin website,
here.
Now, Let's have some fun!
Let's begin by creating a new image 600 by 600 pixels.
Now let's open up our tube and Frame 8.
Drag the frame over to your new image.
It should center perfectly and that's where we will leave it.
Now, let's do the same with our tube.
Except layer it underneath your frame layer.
Open up Paper 6 and layer it underneath the tube layer.
We'll be using it for the frame's background.
Using your magic wand tool, select the inside of the frame.
Selections, Modify, Expand by 5.
Selections, Invert, Then hit delete on both your tube and paper layer.
Open up Glitter 3.
Layer it behind your frames background paper layer.
I left it centered, then duplicated and mirrored it.
Then merge down the two glitter layers.
Let's add some color to the background.
Open up Paper 12.
Add it as the bottom layer.Apply WSL Mask223.Merge group.
Now, isn't that pretty!
Let's add some alphas.
I have chosen to use the letters L-O-V-E-R.
Open up the letters you will be using and resize them all by 75%.
Arrange them on the bottom of your frame.
Open up Flower 2.
Resize it by 50%.
Add one and arrange it under the alpha.
Duplicate and then mirror the flower.
Let's add some glow!
Set your foreground color to #ffcce5 and your background color to #ff1981.
These will be the colors we will use in our glow.
BasicGlow Width - 3.00
Soft corners - 25
Overall Opacity - 100%
Draw Only Outside Checked.
Please refer to the pic below to get your settings right.
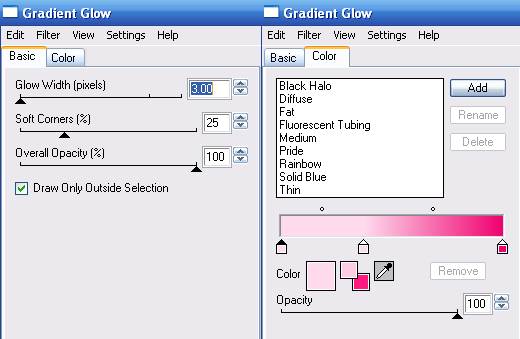
I have added this same glow to my tube layer and all of my alpha layers.
Add your copywrite layers.
Add your name and apply the same gradiant glow as before.
I hope you enjoyed this tutorial.
I would love to see your creations!
Please feel free to use my tutorial as a basic guideline and give it your own spin!!!

 You can download this wonderful freebie