
 Supplies
Tube of Choice - I am using the amazing artwork of Ismael Rac which you must have a license to use. Please do not use his work without purchasing a license from AMI here.
Scrap Kit of Choice - I have used a gorgeous Pay to Use Kit, called Holly Jolly Christmas by Susan from Shal's World, you can pick this kit up at MPT here.
Mask of Choice - I have used Vix Mask 424, made by Vix. You can pick it up here.
Font of Choice - I am using a font called Black Chancery, which you can pick up from DaFont here.
Now, Let's have some fun!
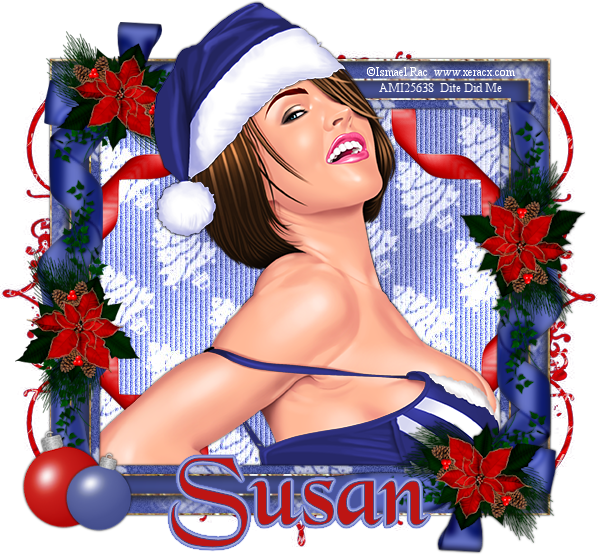
Open up a New Image 600x600 pixels.Open up the tube you will be using.Open up the frame as well, I am using Frame 3.
Drag the frame into the new image you just made and close out the original.Add a Drop Shadow to the frame of 0,0,100, 3, Color is Black.
Also, drag you're tube over. I left mine centered, but you can move yours around where you want her.Add a Drop Shadow to your tube of 0,0,100, 3, Color is Black. Duplicate your tube and place the duplicated tube above the frame.
Go back to your frame layer. Using your magic wand tool, click on the inside of the frame.
Hit Selections, Modify, Expand by 5. Selections and then Invert.On your bottom tube layer, hit the delete button. Select None.
On your top tube layer, using your magic wand tool again, except this time have it set on freehand. Select the bottom of the tube that we don't want sticking out and hit delete, then select none.
Open up a paper of choice. I am using Paper 7. Arrange it underneath your tube layers and the frame. Using your magic wand tool, hit the inside of the frame. Selections, Modify, Expand by 5. Selections then Invert. On your paper layer, hit the delete button. Selections none.
Let's go ahead and add a background layer. Open up another paper of your choice. I am using Paper 22. Arrange it as your background layer.
Let's apply a mask to this layer. I am using the wonderfully gorgeous Mask 424 made by the very talented, Vix. Just apply the mask and then merge the group together.
Let's add some of the Ribbon Wrap. I am using Ribbon Wrap 3. Let's resize it by 75%. Place it on top of the right corner of the frame. Make sure it is under the top tube layer. Add a Drop Shadow to your wrap of 0,0,100, 3, Color is Black. Duplicate the wrap. Then, Image, Mirror, Image, Flip.
I want to add a bit more color. So open up Ribbon Curl. I am using Ribbon Curl 6. Free rotate it by 15. And place it under the frame layer in your tag. Duplicate,and then mirror. Merge down. Duplicate and then flip, and merge down again.
Let's decorate a bit. Open up some ornaments. I am using Ornaments 2 and 3.Free rotate the ornament 15 to the left and then resize by 60%.Place it in the left corner of your frame and add a Drop Shadow to the ornament of 0,0,100, 3, Color is Black.
On your other ornament, Free rotate it by 15 to the right and resize by 50%. Place it on top of the other ornament, and add a Drop Shadow to the ornament of 0,0,100, 3, Color is Black.
Add your copywrite information to your tag.
Now, just add your name, merge visible, and then your all done!


No comments:
Post a Comment